
Instructions / Assembly


Tech Support: 800.653.8567 | info@tacomarine.com | tacomarine.com
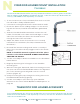
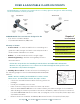
FIXED & ADJUSTABLE CLAMP-ON MOUNTS
1) Marking the Location – Please reference the drawings on
the following pages for the Fixed and Adjustable Clamp-On
Mounts.
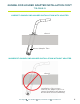
NOTE – Before marking an installation location, ensure
there are no electrical wires inside the pipe or tube.
• Unbolt the assembled mount after removing it from its
package.
• Install your ShadeFin into the unit.
• Have someone help you position the lower cap mount
Alignment Pin
Locking Pin
FIGURE A
At TACO Marine, we always encourage the use of safety glasses and gloves when working
on the installation of these products.
Required*
*not included
•
HAND DRILL
•
1/4” DRILL BIT
•
LIGHT MACHINE GREASE
•
LIGHT MACHINE OIL
•
3/16” ALLEN WRENCH/BIT
•
TORQUE WRENCH
•
PERMANENT MARKER
PLEASE NOTE: These mounts are designed to fit:
• 3/4” and 1” schedule-40 pipe
• 1-1/4” Outside Diameter (OD) tube
Glossary of Terms:
• Center Punch – to make a small hole in something as a
guide for a drill, using a tool with a conical point that is
used to make indentations in metal.
• Deburr – to neaten and smooth the rough edges.
• Wandering/Moving – drill bit moving away from the
desired location.
T10-3000-7 T10-3000-11
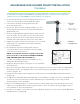
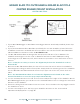
Follow the steps below for installing both the Fixed and Adjustable Clamp-On
Mounts. For any questions or to contact our Technical Support Team, please visit
tacomarine.com/technical-support.
with the ANTI-ROTATION PIN to the exact location you want the angle of the ShadeFin.
• After finding the location you want to mount the ShadeFin, mark the point of contact of
the ANTI-ROTATION PIN in the lower cap (see page 8) on the T-top tube/tower pipe with
a permanent marker.
• Remove both the ShadeFin and Clamp-On Mount from the T-top tube/tower pipe.
6