
Instructions / Assembly


Tech Support: 800.653.8567 | info@tacomarine.com | tacomarine.com
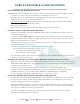
REPLACING THE FABRIC
12
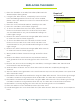
FIGURE E
FIGURE F
Required*
*not included
•
5/32” ALLEN WRENCH
•
9/64” ALLEN WRENCH
1) Place the ShadeFin on a wide, flat surface/table with the
aluminum base facing down.
2) Using a 5/32” Allen wrench, completely loosen the four
bolts and mating washers from the top of the molded,
plastic cover. This allows the cover to be removed from the
ShadeFin body.
3) Place the cover, bolts and washers carefully to the side.
4) Note the orientation of the fabric (Figure E).
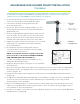
5) To loosen the fabric from the front arms, hold the round
ferule on the bottom side of the ends of the front arms.
You should be able to use your thumb and forefinger to
hold it tight enough.
6) Remove the Allen head screws using a 9/64” Allen wrench
to release it from the ferule (Figure F).
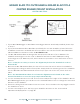
7) To loosen the fabric from the rear arms, hold the round
ferule on the top side of the ends of the rear arms. You
should be able to use your thumb and forefinger to hold it
tight enough.
8) Remove the Allen head screws using a 9/64” Allen wrench
to release it from the ferule (Figure F).
9) Gently slide the fabric channels through and o the front
arms.
10) Remove the fabrics reinforcement strip and two stainless
steel grommets from the mounting posts at the rear of the
unit.
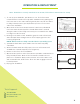
11) Reverse the process when installing the new fabric, ensuring the fabric arm channels and
reinforcement strip are facing up.
12) Slide the fabric channels over the front arms until the arms are completely through the
channels.
13) Slip the stainless steel grommets in the reinforcement strip over the two plastic cover posts that
were removed in step 1.
14) Reinstall the front arm bolts and ferules using the 9/64” Allen wrench. These ferules go through
the fabric’s stainless steel grommets from underneath. The bolts are secured from the top.
15) Reinstall the rear arm bolts and ferules using the 9/64” Allen wrench. These ferules go through
the fabric’s stainless steel grommets from the top. The bolts are secured from the bottom.
16) Reinstall the cover by aligning the holes with the mounting holes on the ShadeFin.
17) Place the washers in the molded top where the bolts enter.
18) Install and tighten the cover bolts with the 5/32” Allen wrench. Take care not to over-torque the
bolts.