
Instructions / Assembly


Tech Support: 800.653.8567 | info@tacomarine.com | tacomarine.com
GRAND SLAM 170 OUTRIGGER & GRAND SLAM 170-2
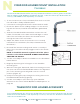
CENTER RIGGER MOUNT INSTALLATION
GS-170 & GS-170-2
1) If your GS-170 Outrigger or GS-170-2 Center Rigger Mounts are already installed, please skip
to step 3.
2) If you purchased a GS-170 or GS-170-2 specifically for use with ShadeFin, please follow the
installation instructions included with these products. You can also find the GS-170 and GS-
170-2 installation instructions online at tacomarine.com.
3) The GS-170 and GS-170-2 are designed to accept poles that are 1-1/8” in diameter. The
ShadeFin mounting post is also 1-1/8” in diameter and has the same TACO pin-locking
technology as 1-1/8” diameter poles, which means it’s possible to use it with either of these
mounts.
Note – It may be necessary to remove the alignment pin from the ShadeFin in order to
allow the fit.
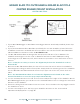
4) On both the GS-170 and GS-170-2, the arm of the mounts has a hole where the ShadeFin’s
mounting post locking pin will lock into place. Simply slide the mounting post of the ShadeFin
into the GS-170 or GS-170-2 arm and ensure the pin pops out of the hole, which locks it in
place.
Note - the GS-170 and GS-170-2 do not have the alignment notch found on the other
mounts listed above to steer the pop-out pin automatically.
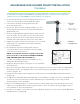
5) Use the Sure-Grip Knob on the side of the mount to adjust the height of the ShadeFin. On the
GS-170 Outrigger Mount, you can also use the outward rotation lever to change the horizontal
direction of the ShadeFin.
6) Ensure the lifting knob and rotation lever are secure. There should not be any wiggle room for
the ShadeFin to move.
7) You are now ready to open and enjoy your ShadeFin. Continue to the section titled
“Operation & Deployment” on page 10.
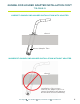
10
Alignment Pin
Locking Pin
FIGURE A