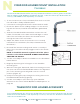
PATENT NO. 10, 604, 214 ® INSTRUCTIONS AVAILABLE MOUNTING OPTIONS • • • • • • • • • • Fixed Rod Holder Mount, T10-3000-5 Adjustable Rod Holder Mount, T10-3000-6 Gunnel Rod Holder Adapter, T10-3000-12 Adjustable Clamp-On Mount, fits 3/4”, 1” pipe & 1-1/4” tube, T10-3000-7 Telescopic Rod Holder Accessory, T10-3000-9 Hardtop Mount Bracket, T10-3000-10 Fixed Clamp-On Mount, fits 3/4”, 1” pipe & 1-1/4” tube, T10-3000-11 Gunnel Rod Holder Adapter, 1-1/2” O.D. X 13.
SHADEFI Thank you for purchasing ShadeFin by TACO Marine. Since 1959, we have taken great pride in offering the highest-quality products with excellent customer service. We stand behind our products 100 percent. Please visit our website tacomarine.com for more detailed information on a wide variety of products and to register your new accessory for warranty.
N FIXED ROD HOLDER MOUNT INSTALLATION T10-3000-5 The Fixed Rod Holder Mount fits into any standard rod holder or into a gunnel rod holder with an adapter (T10-3000-12, included in the kit), or into the Telescopic Rod Holder Accessory (T10-3000-9, sold separately, see below). 1) 2) 3) 4) 5) 6) 7) 8) 9) 10) 11) To use this mount in a T-top rod holder, first check to ensure the rod holder is firmly welded in place. Unscrew the Locking Knob from the mount and set aside.
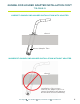
GUNNEL ROD HOLDER ADAPTER INSTALLATION T10-3000-12 WARNING: do not install the ShadeFin™ Fixed or Adjustable Rod Holder Mount into a gunnel rod holder without the use of the supplied Gunnel Rod Holder Adaptor. This will damage the threads and void the warranty. 1. Install the Gunnel Rod Holder Adaptor into the gunnel rod holder. Please note: there are two possible positions based on if you want the ShadeFin™ to face fore and aft or perpendicular to the gunnel. 2.
GUNNEL ROD HOLDER ADAPTER INSTALLATION CON’T T10-3000-12 CORRECT GUNNEL ROD HOLDER INSTALLATION WITH ADAPTER Gunnel Gunnel Mount Adaptor TubeTube Mount Adapter INCORRECT GUNNEL ROD HOLDER INSTALLATION WITHOUT ADAPTER Gunnel Installation of the mount without the adaptor tube in a gunnel installation will damage the threads and void warranty Tech Support: 800.653.8567 | info@tacomarine.com | tacomarine.
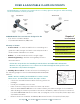
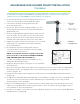
FIXED & ADJUSTABLE CLAMP-ON MOUNTS At TACO Marine, we always encourage the use of safety glasses and gloves when working on the installation of these products. T10-3000-7 T10-3000-11 Required* PLEASE NOTE: These mounts are designed to fit: • • *not included 3/4” and 1” schedule-40 pipe 1-1/4” Outside Diameter (OD) tube Glossary of Terms: • Center Punch – to make a small hole in something as a guide for a drill, using a tool with a conical point that is used to make indentations in metal.
FIXED & ADJUSTABLE CLAMP-ON MOUNTS Drill and Prepare the Rotation/Set Pin Hole IMPORTANT – Before drilling, ensure there are no electrical wires inside the pipe or tube. • It is best to “center-punch” the mark prior to drilling the 1/4” hole. • This will help keep the drill bit from “wandering/moving” when beginning to drill. • Apply grease to the tip of a 1/4” metal drill bit.
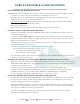
CLAMP-ON MOUNT TECHNICAL DRAWING Tech Support: 800.653.8567 info@tacomarine.com tacomarine.
ADJUSTABLE ROD HOLDER MOUNT INSTALLATION T10-3000-6 The Adjustable Rod Holder Mount fits into any standard rod holder or into a gunnel rod holder with an adapter (T10-3000-12, included in the kit), or into the Telescopic Rod Holder Accessory (T10-3000-9, sold separately, see page 4). 1) 2) 3) 4) 5) 6) 7) 8) 9) 10) 11) 12) 13) To use this mount in a T-top rod holder, first check to ensure the rod holder is firmly welded in place. Unscrew the bottom Locking Knob from the mount and set aside.
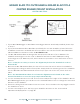
GRAND SLAM 170 OUTRIGGER & GRAND SLAM 170-2 CENTER RIGGER MOUNT INSTALLATION GS-170 & GS-170-2 Alignment Pin Locking Pin FIGURE A 1) 2) 3) 4) 5) 6) 7) 10 If your GS-170 Outrigger or GS-170-2 Center Rigger Mounts are already installed, please skip to step 3. If you purchased a GS-170 or GS-170-2 specifically for use with ShadeFin, please follow the installation instructions included with these products. You can also find the GS-170 and GS170-2 installation instructions online at tacomarine.com.
OPERATION & DEPLOYMENT Once ShadeFin is securely attached to its mount, follow these instructions for setup. 1) 2) 3) 4) 5) 6) 7) 8) To set up your ShadeFin, pull down on one of the front arm release buttons inside the body while simultaneously pulling out the front arm on the same side (Figure B). Do not pull the arm to its fully locked position yet. Repeat this process on the other side of the ShadeFin.
REPLACING THE FABRIC 1) 2) 3) 4) 5) 6) 7) 8) 9) 10) 11) 12) 13) 14) 15) 16) 17) 18) 12 Place the ShadeFin on a wide, flat surface/table with the Required aluminum base facing down. *not included Using a 5/32” Allen wrench, completely loosen the four • 5/32” ALLEN WRENCH bolts and mating washers from the top of the molded, plastic cover. This allows the cover to be removed from the • 9/64” ALLEN WRENCH ShadeFin body. Place the cover, bolts and washers carefully to the side.
CLEANING & FABRIC CARE FRAME CLEANING FABRIC CARE 1) Clean using only fresh water. 2) 3) 4) 5) 6) Brush off loose dirt. Hose down with fresh water. Prepare a cleaning solution of water and mild soap. Use a soft bristle brush to clean. Rinse thoroughly until all soap residue is removed. Air dry. FABRIC TECHNICAL INFORMATION ShadeFin’s fabric is a super high-strength and durable material with long-term color retention to deliver a truly versatile outdoor fabric for a variety of applications.
STOWAGE SHADEFIN 1) 2) 3) 4) 5) 6) 7) 8) 9) While applying a slight forward pressure to the front arms, pull down on the locking buttons and allow the front arms to unlock and swing freely (Figure B). Fold the front two arms together while lifting the fabric up between them. Slide the back arms forward in the slide track (Figure G). Carefully tuck the fabric into the side and front of the body. Push the front arms into the body until they latch. (The arms will help hold the fabric in place.
WARNING 100 WARNING 95 75 IMPROPER USE CAN CAUSE SERIOUS INJURY OR DEATH REMOVE AND STOW SHADEFIN WHILE BOAT IS UNDERWAY. LOCK ALL MOUNTS AND PINS BEFORE DEPLOYING SHADEFIN. MOVING PARTS CAN PRODUCE PINCH POINTS.
Like, subscribe and follow us on YouTube, Facebook, Instagram and Twitter, where we post regular boating content and engaging how-to videos.