Silicon Graphics® F190 Flat Panel Display User Guide
TCO’99 Congratulations! You have just purchased a TCO’99 approved and labeled product! Your choice has provided you with a product developed for professional use. Your purchase has also contributed to reducing the burden on the environment and also to the further development of environmentally adapted electronics products.
TCO’99 - Continued Mercury** Mercury is sometimes found in batteries, relays and switches, Mercury damages the nervous system and is toxic in high doses. TCO’99 requirement states that batteries may not contain any Mercury. It also demands that no mercury is present in any of the electrical or electronics components associated with the display unit. CFCs (freons) CFCs (freons) are sometimes used for washing printed circuit boards.
Manufacturer’s Recycling and Energy Information SGI is strongly committed to environmental protection and sees recycling as one of the company’s top priorities in trying to minimize the burden placed on the environment. We are engaged in developing environmentally-friendly products. For more information on SGI’s Environmental Policy and Practices, please visit our website at http://www.sgi.com/company_info/environment/policy.html Country-specific recycling programs can also be found at: Sweden - http://www.
Index Safety Instruction .................. English-1 Warning ................................... English-1 Caution .................................... English-1 Contents .................................. English-2 Quick Start .............................. English-3 Controls ................................... English-6 Recommended use ................ English-8 Specifications ..................... English-10 Features ................................ English-11 Troubleshooting ...................
WARNING TO PREVENT FIRE OR SHOCK HAZARDS, DO NOT EXPOSE THIS UNIT TO RAIN OR MOISTURE. ALSO, DO NOT USE THIS UNIT’S POLARIZED PLUG WITH AN EXTENSION CORD RECEPTACLE OR OTHER OUTLETS UNLESS THE PRONGS CAN BE FULLY INSERTED. REFRAIN FROM OPENING THE CABINET AS THERE ARE HIGH VOLTAGE COMPONENTS INSIDE. REFER SERVICING TO QUALIFIED SERVICE PERSONNEL. CAUTION RISK OF ELECTRIC SHOCK • DO NOT OPEN CAUTION: TO REDUCE THE RISK OF ELECTRIC SHOCK, DO NOT REMOVE COVER (OR BACK). NO USER SERVICEABLE PARTS INSIDE.
Contents Your new Silicon Graphics F190 Flat Panel Display box* should contain the following: • Display with tilt base • User’s Manual • Video Signal Cable (DVI-D to DVI-D) • Cable Management Cover Video Signal Cable (DVI-D to DVI-D) User's Manual * Cable Management Cover Remember to save your original box and packing material to transport or ship the display.
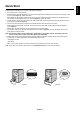
English Quick Start To attach the F190 Display to your system, follow these instructions: 1. Turn off the power to your computer. 2. For Workstations with DVI digital output: Connect the DVI signal cable (included) to the connector of the graphics card in your system (Figure A). Tighten all screws. For Workstations with Analog output: Connect the 15-pin mini D-SUB signal cable (supplied with the Workstation) to the connector of the graphics card in your system (Figure B). Tighten all screws. 3.
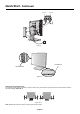
Quick Start - Continued INPUT1 INPUT2 Figure C Power Button Vacation Switch Figure D Raise and Lower Monitor Screen The monitor may be raised or lowered. To raise or lower screen, place hands on each side of the monitor and lift or lower to the desired height (Figure RL 1). Figure RL 1 Note: Handle with care when raising or lowering the monitor screen.
Tilt and swivel Grasp both sides of the display screen with your hands and adjust the tilt and swivel as desired (Figure E). Figure E Note: Handle with care when tilting the monitor screen. Remove Display Stand for Mounting To prepare the monitor for alternate mounting purposes: 1. Disconnect all cables. 2. Place hands on each side of the monitor and lift up to the highest position. 3. Place monitor face down on a non-abrasive surface (Place the screen on a 55 mm/2.
Controls OSD (On-Screen Display) control buttons on the front of the display function as follows: To access OSD menu, press any of the control buttons (EXIT, To change signal input, press the SELECT button. NOTE: , , –, +). OSD must be closed in order to change signal input. Menu EXIT Exits the OSD controls. Exits to the OSD main menu. / Moves the highlighted area left/right to select control menus. Moves the highlighted area up/down to select one of the controls.
English Controls - Continued Color Control Systems Color Control Systems: Six color presets select the desired color setting (sRGB and NATIVE color presets are standard and cannot be changed). R, G, B: Increases or decreases Red, Green or Blue color depending upon which is selected. The change in color will appear on screen and the direction (increase or decrease) will be shown by the bars.
Recommended use Safety Precautions and Maintenance FOR OPTIMUM PERFORMANCE, PLEASE NOTE THE FOLLOWING WHEN SETTING UP AND USING THE LCD COLOR DISPLAY: • DO NOT OPEN THE DISPLAY. There are no user serviceable parts inside and opening or removing covers may expose you to dangerous shock hazards or other risks. Refer all servicing to qualified service personnel. • Do not spill any liquids into the cabinet or use your display near water.
CORRECT PLACEMENT AND ADJUSTMENT OF THE DISPLAY CAN REDUCE EYE, SHOULDER AND NECK FATIGUE. CHECK THE FOLLOWING WHEN YOU POSITION THE DISPLAY: • For optimum performance, allow 20 minutes for warm-up. • Adjust the display height so that the top of the screen is at or slightly below eye level. Your eyes should look slightly downward when viewing the middle of the screen. • Position your display no closer than 40 cm and no further away than 70 cm from your eyes. The optimal distance is 50 cm.
Specifications Monitor Specifications F190 Flat Panel Display LCD Module Diagonal : 48cm/19 inches Viewable Image Size : 48cm/19 inches Native Resolution (Pixel Count): 1280 x 1024 Input Signal Video : Sync : Display Colors Analog input : Synchronization Range Horizontal: Vertical: Image Formation Time Resolutions Supported Active Display Area Horiz.: Vert.
Reduced Footprint: Provides the ideal solution for environments requiring superior image quality but with size and weight limitations. The display’s small footprint and low weight allow it to be moved or transported easily from one location to another. OSD (On-Screen Display) Controls: Allow you to quickly and easily adjust all elements of your screen image via simple to use on-screen menus.
Troubleshooting No picture • The signal cable should be completely connected to the display card/computer. • The display card should be completely seated in its slot. • Check the Vacation Switch should be in the ON position. • Front Power Switch and computer power switch should be in the ON position. • Check to make sure that a supported mode has been selected on the display card or system being used. (Please consult display card or system manual to change graphics mode.