
Operating instructions


8
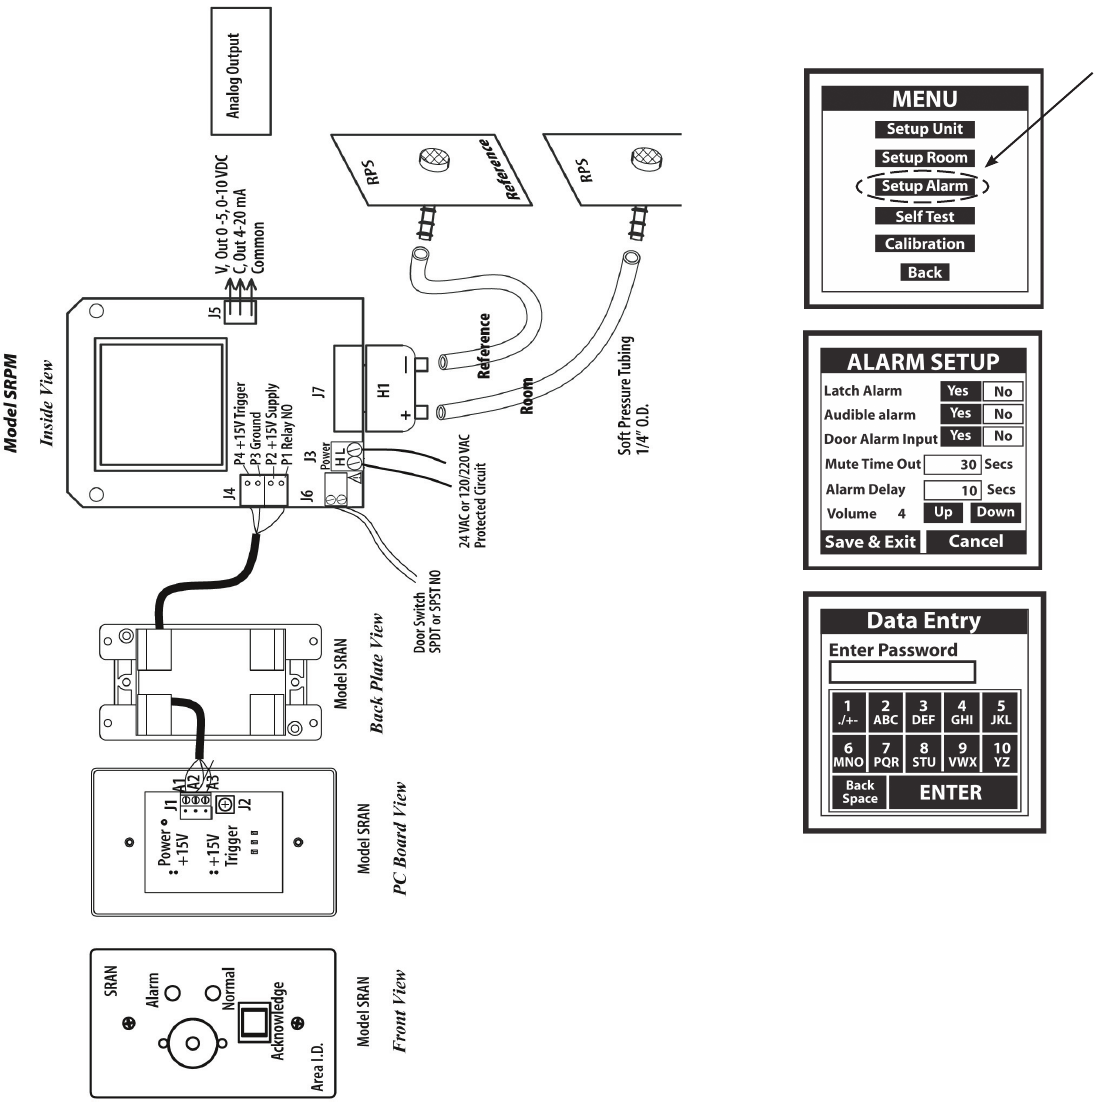
Figure 2: Location of Components and Accessories
21
7.5 SETUP ALARM SCREEN
7.5.3 Data Entry Screen
Enter numbers by pressing each key in sequence until the desired character is displayed in
the data entry box above the keypad. (Note: The cursor will blink for one to two seconds then
stop and display the character.) Erase any mistakes by using the “Back Space” key. When fin-
ished entering data, “Press Enter” key and return to SETUP UNIT screen, press “Save and Exit”
to return to MAIN MENU, then press “Back” to return to PRESSURE MONITORING SCREEN.
Example:
Enter number 3, press (or tap) 3/DEF key once
Enter the letter T, press (or tap) the 8/STU key three times in succession.
Note: Use the eraser end of a pencil or back-end of a pen to press (or tap) box on screen to
increase accuracy of inputs.
Press to Access Screen
The user can:
a.) Latched Alarm requires the pressure to return to
normal and be acknowledged before alarm can be
“Silenced” and “Reset”.
b.) Enable the audible alarm “Yes” or use visual only alarm
“No” signaling
c.) Provide a door “open” pre-alarm visual indication.
When activated the door status “open” condition is indi-
cated by the touch screen display turning from green to
yellow, and door open indicated on Default Screen.
d.) Set the time in seconds that the alarm can be silenced
in the latched alarm mode before the alarm resumes.
This assumes that the room static pressure is still outside
the normal or set operating limits. The Mute Time Out
can be set from 0 to 60 seconds.
e.) Set the Alarm Delay in seconds from the time that
the room pressure goes out of the preset limits until the
alarm activates. The alarm delay may be set from 0 to 60
seconds.
f.) Set the alarm volume or sound level. Using the Up and
Down keys, the volume can bet set at level 1-4. Level 4
alarm volume is the loudest and corresponds to a sound
level of 85 db at a distance of 4 inches.
7.5.1 Alarm Setup Operation
Lightly Press (or tap) button to select “Yes” or No” for
Latch Alarm, Audible alarm, or Door Alarm Input . Se-
lected box background will change from clear to black.
7.5.2 Entering Data
7.5.2.1 Mute Time Out/Alarm Delay
Pressing (or tapping) the “Mute Time Out” or “Alarm
Delay” box activates the “Data Entry” screen (see 7.5.3) to
set the time.