
Operation Manual


24
Menu Operations
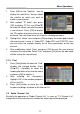
2. TP Index: Use [Vol◄/►] to select the desired transponder or press [OK] to
open the TP list to select directly with [CH▲/▼], press [OK] again to
display the TP number where the channel can be found. Press [Red /
Green / Yellow] key on the RCU for the related functions.
♦ When you press [Red] it will display “New TP” in “TP Index” item. You
have to set the parameters of “TP Frequency”, “Symbol Rate” for this
new transponder. Therefore use the number buttons of the RCU. The
available range are “3000~13450MHz” and “1000~45000KS/s”.
♦ When you press [Green] a safety question will be displayed for
confirmation to delete the current transponder or not. If you select
“OK”, the current transponder will be deleted and the total number of
transponders will be reduced.
♦ When you press [Yellow] a safety question will be displayed for
confirmation to delete all transponders or not. If you select “OK”, the all
transponders on current satellite will be deleted.
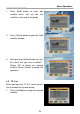
3. For existing transponders you also can use number buttons to modify the
parameters of “TP Frequency” and “Symbol Rate” or [Vol◄/►] to change
the value directly. “Polarity” and “FTA only” are used for setting scans
conditions. Press [Vol◄/►] to select a different mode.
On “TP Scan” item, press [OK] will open another window where you can set
“Scan Mode”, “Program Type” and “NIT Search”. Press [Menu/Exit] to return
to the previous menu.
Press [Red] button to add a new TP.
Press [Green] button to delete the current TP.
Press [Yellow] button to delete all transponders on current satellite.
4. Antenna Setup: Press [OK] to enter LNB configuration, you will see a
window like beside:
LNB Type: Press [Vol◄/►] to switch
among “Standard”, “User” and
“Universal” mode.
For Example: If you use a Dual LNB,
then you should select “User” option
in “LNB Type” and set the correct
frequency in LNB type.