
Quick Start Guide


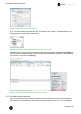


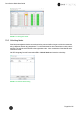
Table Of Contents
- 1 Electronic Shelf Labeling – A brief introduction
- 2 Label Family Introduction
- 3 Get the latest software and documentation
- 4 Core Appliance
- 5 Core Appliance initial setup
- 6 Start SES-imagotag Core Service and SES-imagotag Control Center
- 7 ESL Access Point Configuration
- 8 Selecting channels
- 9 Setup Security
- 10 Register labels
- 11 Start tagging
- 12 Templates
- 13 Integration
- 14 Troubleshooting
- 14.1 SES-imagotag Core Service Dashboard
- 14.2 Running the SES-imagotag Core Service as a background service
- 14.3 Where can get a demo/development license key?
- 14.4 Deleting the demo articles
- 14.5 Establish a network configuration when no DHCP is available – Step by step
- 14.6 Access point discovering with Bonjour Services
- 14.7 What can I do if the Status LED of the AP-2010 access point doesn’t turn blue?
- 14.8 Labels don’t come online
- 14.9 The encryption does not work
- 14.10 Unlocking labels
- 14.11 Starting Java applications
- 14.12 Encoding problems
- 14.13 Reserve RAM for Java heap space
- 14.14 Further documentation

Core Service Quick Start Guide
Page 23 of 45
FIGURE 1-20: New Access Point Configuration
Note: You can find the access point ID under “LCOS Menu Tree – Status – Wireless ePaper” or on
the backside of the access point, shown below.
FIGURE 1-21: Wireless ePaper AP-ID on the backside of the access point
After saving the AP configuration you should see the AP under System -> Access Point Status as
ONLINE. Also the Status in the web-GUI of the LANCOM access point changes from State “Waiting-
for-Controller-Connection” to “Running”
FIGURE 1-22: Access point and Wireless-ePaper status changes
7.2.8 Automatic channel selection
If you don’t want the access point(s) to decide the channels (Automatic selection) automatically an
ESL channel must be selected on each access point in the network. There are 11 non overlapping