
Quick Start Guide


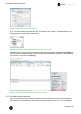


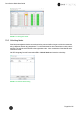
Table Of Contents
- 1 Electronic Shelf Labeling – A brief introduction
- 2 Label Family Introduction
- 3 Get the latest software and documentation
- 4 Core Appliance
- 5 Core Appliance initial setup
- 6 Start SES-imagotag Core Service and SES-imagotag Control Center
- 7 ESL Access Point Configuration
- 8 Selecting channels
- 9 Setup Security
- 10 Register labels
- 11 Start tagging
- 12 Templates
- 13 Integration
- 14 Troubleshooting
- 14.1 SES-imagotag Core Service Dashboard
- 14.2 Running the SES-imagotag Core Service as a background service
- 14.3 Where can get a demo/development license key?
- 14.4 Deleting the demo articles
- 14.5 Establish a network configuration when no DHCP is available – Step by step
- 14.6 Access point discovering with Bonjour Services
- 14.7 What can I do if the Status LED of the AP-2010 access point doesn’t turn blue?
- 14.8 Labels don’t come online
- 14.9 The encryption does not work
- 14.10 Unlocking labels
- 14.11 Starting Java applications
- 14.12 Encoding problems
- 14.13 Reserve RAM for Java heap space
- 14.14 Further documentation

Core Service Quick Start Guide
Page 22 of 45
7.2.6 Status – Wireless ePaper
Navigation: “LCOS Menu Tree – Status – Wireless ePaper”
After configuration you can see a summary of your Wireless ePaper settings under
FIGURE 1-18: LCOS Menu Tree - Status - Wireless ePaper
7.2.7 Necessary configuration at the SES-imagotag Control Center
After the configuration in the LANCOM web user interface it’s necessary to add this AP via the SES-
imagotag Control Center: System -> Access Point Configuration -> New … when the access
point is discovered via System -> Access Point Status, right click on the discovered access point
and create the configuration.
FIGURE 1-19: SES-imagotag Control Center - System - Access Point Configuration - New
Choose “Manual Configuration” and enter Access Point ID (AP ID), IP address (Host) and correct
port value.