
Quick Start Guide


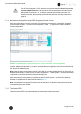

Table Of Contents
- 1 Electronic Shelf Labeling – A brief introduction
- 2 Label Family Introduction
- 3 Get the latest software and documentation
- 4 Core Appliance
- 5 Core Appliance initial setup
- 6 Start SES-imagotag Core Service and SES-imagotag Control Center
- 7 ESL Access Point Configuration
- 8 Selecting channels
- 9 Setup Security
- 10 Register labels
- 11 Start tagging
- 12 Templates
- 13 Integration
- 14 Troubleshooting
- 14.1 SES-imagotag Core Service Dashboard
- 14.2 Running the SES-imagotag Core Service as a background service
- 14.3 Where can get a demo/development license key?
- 14.4 Deleting the demo articles
- 14.5 Establish a network configuration when no DHCP is available – Step by step
- 14.6 Access point discovering with Bonjour Services
- 14.7 What can I do if the Status LED of the AP-2010 access point doesn’t turn blue?
- 14.8 Labels don’t come online
- 14.9 The encryption does not work
- 14.10 Unlocking labels
- 14.11 Starting Java applications
- 14.12 Encoding problems
- 14.13 Reserve RAM for Java heap space
- 14.14 Further documentation

Core Service Quick Start Guide
Page 19 of 45
The AP-2010 supports 11 ESL channels. It’s recommended to choose one of the
recommended channels: 3, 5, 8, 9 or 10. These channels do not interfere with
standard Wi-Fi channels 1, 6, 11 and are scanned by the labels more often. For
further information about selecting channels see point see Selecting channels on
page 25.
7.1.4 Necessary configuration at the SES-imagotag Control Center
After the configuration in the AP-2010 web UI it’s necessary to add this AP via the SES-imagotag
Control Center: System – Access Point Configuration – New … or right click on a discovered AP-
Create configuration.
FIGURE 1-14: SES-imagotag Control Center System - Access Pont Status - Create configuration
Choose “Manual Configuration” if you don’t use Centralized Configuration and enter Access Point ID
(AP ID) and IP address (Host).
Note: After the basic configuration in the AP-2010 web UI, it is also possible to fill in AP-ID and AP-IP
address automatically. For this choose "Create Configuration..." under System – Access Point Status
- Right click on the discovered and configured access point.
After saving the AP configuration you should see the AP under System – Access Point Status as
ONLINE. In addition the AP status LED should turn BLUE.
Note: It is possible to configure the access point via hostname. To get this working there has to be a
corresponding entry in the DNS.
7.1.5 The Status LED
There are several LED colors that indicates the main status of the access point.