
Quick Start Guide


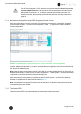

Table Of Contents
- 1 Electronic Shelf Labeling – A brief introduction
- 2 Label Family Introduction
- 3 Get the latest software and documentation
- 4 Core Appliance
- 5 Core Appliance initial setup
- 6 Start SES-imagotag Core Service and SES-imagotag Control Center
- 7 ESL Access Point Configuration
- 8 Selecting channels
- 9 Setup Security
- 10 Register labels
- 11 Start tagging
- 12 Templates
- 13 Integration
- 14 Troubleshooting
- 14.1 SES-imagotag Core Service Dashboard
- 14.2 Running the SES-imagotag Core Service as a background service
- 14.3 Where can get a demo/development license key?
- 14.4 Deleting the demo articles
- 14.5 Establish a network configuration when no DHCP is available – Step by step
- 14.6 Access point discovering with Bonjour Services
- 14.7 What can I do if the Status LED of the AP-2010 access point doesn’t turn blue?
- 14.8 Labels don’t come online
- 14.9 The encryption does not work
- 14.10 Unlocking labels
- 14.11 Starting Java applications
- 14.12 Encoding problems
- 14.13 Reserve RAM for Java heap space
- 14.14 Further documentation

Core Service Quick Start Guide
Page 11 of 45
5 Core Appliance initial setup
To operate the Core Appliance there are only a few steps necessary:
1. Supply with power
2. Turn it on (button on the backside of the device)
3. Plug it into your network
4. Initial setup
5. Update to the latest version
Per default, the Core Appliance comes with DHCPenabled. So if you have a DHCPservice running
you can find it with the MAC address which is printed on the bottom side of the Core Appliance.
If there's no way to get access to the DHCPserver we recommend to use an USBdevice with a
configuration file to configure the appliance initially.
FIGURE 1-4: Core Appliance rear view
5.1 USB device configuration
You can find an example configuration file (example.config) at ourSES-imagotag Customer and
Partner Portal.
Core Appliance service reference mode | Core Appliance example.config file
After downloading, editing and copying the configuration file onto any USBdevice, the configuration
is automatically adopted after plugging in the USB flash drive into the Core Appliance. A triple beep
indicates the successful configuration. A single beep signals that the configuration hasn't been set
successful.
Theweb user interface of the Core Appliance is now available under http://<ip-address>.
The initial configuration of the Core Appliance can be compared with the installation and start of an
SES-imagotag Core Service. After configuration, you can access the Core Appliance via the SES-
imagotag Control Center from every system connected to your network (see Starting on page 1).
Example.config file
To set up your Core Appliance for the first run you'll have to set at least the following network
parameters:
l IPaddress
l Subnet mask
l Optional: Gateway, DNS
To set the parameters mentioned above the contents of the configuration file might look like this:
# Set IP address of bridge interface
set network br0 192.168.1.100 255.255.255.0
# Set a gateway