
Quick Start Guide

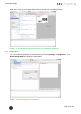


Table Of Contents
- [Introduction]
- 1 Electronic Shelf Labeling – A brief introduction
- 2 What’s in your Smart Box?
- 3 The G1 label family
- 4 Core appliance
- [Getting Started]
- 1 Get the latest software and documentation
- 2 Install software
- 3 Core appliance initial setup
- 4 Start Core Service and Control Center
- 5 Access Point Configuration
- 6 Setup Security
- 7 Register labels
- 8 Start tagging
- 9 Integration
- [Troubleshooting]
- 1 FAQ
- 1.1 imagotag Core Service Dashboard
- 1.2 Running the imagotag Core Service as a background service
- 1.3 Where can I find the license file for my SmartBox?
- 1.4 Deleting the demo articles
- 1.5 Labels don’t come online
- 1.6 The encryption does not work
- 1.7 Unlocking labels
- 1.8 Starting Java applications
- 1.9 Encoding problems
- 1.10 Further documentation
- _Ref387048594
- _Ref386612307
- _Ref386612318
- _Toc409448034
- Activati

Quick Start Guide
Page 43 of 50
After enabling the Design Mode a new tab will show up.
FIGURE 1-46: Template Editor Design Tab
8.5.2.4 Enable and show color red
As there are new label types which are capable of showing the color "red"there's a short
description how to enable this inside the xsl template file.
l Optional: Query whether it is a "red" label
l
<xsl:when test="Label/DisplayWidth = XXX and Label/DisplayHeight =
XXX and
Label/DisplayColors = 'BLACK_WHITE_RED'">
l Add colors option to image tag:
l
<image width="XXX" height="XXX"
colors="true" font-family="XXX">
l Show something in color red, e.g. text:
l
<text font-size="XXX" condense="XXX" font-weight="XXX"
color=”red”>
8.5.2.5 Help Content
There’s a link to the Help content for the Template Editor, open it by clicking Help – Help
Content in the Template Editor or open the file index.html located in
C:\imagotag\template\help\.
Also you can find further information on the USB Stick under Documentation - Image Rendering
Reference.