
Quick Start Guide


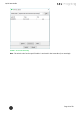


Table Of Contents
- [Introduction]
- 1 Electronic Shelf Labeling – A brief introduction
- 2 What’s in your Smart Box?
- 3 The G1 label family
- 4 Core appliance
- [Getting Started]
- 1 Get the latest software and documentation
- 2 Install software
- 3 Core appliance initial setup
- 4 Start Core Service and Control Center
- 5 Access Point Configuration
- 6 Setup Security
- 7 Register labels
- 8 Start tagging
- 9 Integration
- [Troubleshooting]
- 1 FAQ
- 1.1 imagotag Core Service Dashboard
- 1.2 Running the imagotag Core Service as a background service
- 1.3 Where can I find the license file for my SmartBox?
- 1.4 Deleting the demo articles
- 1.5 Labels don’t come online
- 1.6 The encryption does not work
- 1.7 Unlocking labels
- 1.8 Starting Java applications
- 1.9 Encoding problems
- 1.10 Further documentation
- _Ref387048594
- _Ref386612307
- _Ref386612318
- _Toc409448034
- Activati

Quick Start Guide
Page 37 of 50
FIGURE 1-37: New matchings dialog
Another way to create/edit matchings is under “Matchings – All Matchings”:
l Select the desired data records (Label ID, Article Number) in the following window “New
Matching Record“ (either manually or with the magnifying glass symbol). Select an appro-
priate template via “Template” that should be used to generate the image.
l Confirm your choice by clicking Save. After that, the generated image is sent to the selec-
ted label.
FIGURE 1-38: Create a matching
It’s also possible to create Matchings with imagotag Control Center under Labels and Articles,
for this just select the desired article or label, right-click on it and select “New matching…” (the
new matching dialog will be pre-filled with the article or label information).