
Quick Start Guide

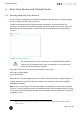

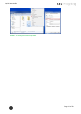


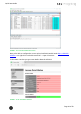
Table Of Contents
- [Introduction]
- 1 Electronic Shelf Labeling – A brief introduction
- 2 What’s in your Smart Box?
- 3 The G1 label family
- 4 Core appliance
- [Getting Started]
- 1 Get the latest software and documentation
- 2 Install software
- 3 Core appliance initial setup
- 4 Start Core Service and Control Center
- 5 Access Point Configuration
- 6 Setup Security
- 7 Register labels
- 8 Start tagging
- 9 Integration
- [Troubleshooting]
- 1 FAQ
- 1.1 imagotag Core Service Dashboard
- 1.2 Running the imagotag Core Service as a background service
- 1.3 Where can I find the license file for my SmartBox?
- 1.4 Deleting the demo articles
- 1.5 Labels don’t come online
- 1.6 The encryption does not work
- 1.7 Unlocking labels
- 1.8 Starting Java applications
- 1.9 Encoding problems
- 1.10 Further documentation
- _Ref387048594
- _Ref386612307
- _Ref386612318
- _Toc409448034
- Activati

Quick Start Guide
Page 12 of 50
3.1.1 Example.config file
To set up your appliance for the first run you'll have to set at least the following network
parameters:
l IPaddress
l Subnet mask
l Optional: Gateway, DNS
To set the parameters mentioned above the contents of the configuration file might look like
this:
# Set IP address of bridge interface
set network br0 192.168.1.100 255.255.255.0
# Set a gateway
set gateway 192.168.1.1
# Set a nameserver
set dns 192.168.1.21
Note:This simple bridge configuration connects the network interfaces. No matter where the
network cable is plugged in, the appliance is accessible via the configured bridge address.
3.2 Configuration file creator
You'll also find a appliance configuration file creator wizard at our imagotag Customer and
Partner Portal. The wizard will help to create the correct configuration file which is used to set
the following configuration parameters:
Mandatory:
l Appliance ID
l IPaddress
l Subnet mask
Optional:
l Title
l Store ID
l Comment
l Hostname
l Default Gateway
l Nameserver 1
l Nameserver 2