
Quick Start Guide
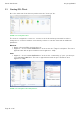
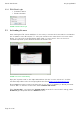


Table Of Contents
- [Introduction]
- 1 Electronic Shelf Labeling – A brief introduction
- 2 The G1 label family
- 3 What’s in your Smart Box?
- [Getting Started]
- 1 Latest Software and Documentation
- 2 Install software
- 3 Start Server and Client
- 4 Connect and configure Access Point AP-2010
- 5 Setup Security
- 6 Register labels
- 7 Start tagging
- 8 Integration
- [Troubleshooting]
- 1 FAQ
- 1.1 Running the ESL Server as a background service
- 1.2 Where can I find the license file for my SmartBox?
- 1.3 Deleting the demo articles
- 1.4 Establish a network configuration when no DHCP is available – Step by step
- 1.5 AP discovering with Bonjour Services
- 1.6 What can I do if the Status LED of the AP-2010 access point doesn’t turn blue?
- 1.7 Labels don’t come online
- 1.8 The encryption does not work
- 1.9 Unlocking labels
- 1.10 Starting Java applications
- 1.11 Encoding problems
- 1.12 Further documentation
- _Ref387048594
- _Ref386612307
- _Ref386612318
- Activati
- _Ref384813549
- _Ref388607844
- _Ref388607849

Quick Start Guide imagotag GmbH
Page 19 of 36
6 Register labels
In order that labels can join the network it is necessary to register them first.
6.1 General procedure
Via the ESL Client under File – Register Labels it’s possible to register your labels manually with
the registration code shown on each single label or you could import a CSV file with your
registration codes. In order to refresh the entries press the refresh button shown in the next
figure.
Important Note: After the registration it could last a certain time until all registered labels are
joined to the network (from 30 minutes up to two hours, depending on configured access point
channels). After this you can send images to each label (see Start tagging on page 23).
FIGURE 1-17: Add/Delete Label and refresh entries
6.2 What's on the label?
All labels will arrive with its registration code (11-digit alphanumeric)shown on the display of the
label. The code is printed as a 2D QR code, as a 1D Code128 barcode and as human readable
text. The registration process for the customer is easy – he has only to scan one of this
barcodes. The ESLServer will than automatically start the key exchange with the label secured by
the PIN extracted from the registration code.
The two relevant codes:
1.
The label ID (8-digit hexadecimal) to identify the label (it's also the radio address which is
similar to a MAC address).
2.
The registration code (11-digit alphanumeric) is required to activate the encryption. This
code also contains the label ID and a random PIN code.