
Quick Start Guide
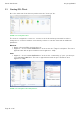
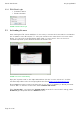


Table Of Contents
- [Introduction]
- 1 Electronic Shelf Labeling – A brief introduction
- 2 The G1 label family
- 3 What’s in your Smart Box?
- [Getting Started]
- 1 Latest Software and Documentation
- 2 Install software
- 3 Start Server and Client
- 4 Connect and configure Access Point AP-2010
- 5 Setup Security
- 6 Register labels
- 7 Start tagging
- 8 Integration
- [Troubleshooting]
- 1 FAQ
- 1.1 Running the ESL Server as a background service
- 1.2 Where can I find the license file for my SmartBox?
- 1.3 Deleting the demo articles
- 1.4 Establish a network configuration when no DHCP is available – Step by step
- 1.5 AP discovering with Bonjour Services
- 1.6 What can I do if the Status LED of the AP-2010 access point doesn’t turn blue?
- 1.7 Labels don’t come online
- 1.8 The encryption does not work
- 1.9 Unlocking labels
- 1.10 Starting Java applications
- 1.11 Encoding problems
- 1.12 Further documentation
- _Ref387048594
- _Ref386612307
- _Ref386612318
- Activati
- _Ref384813549
- _Ref388607844
- _Ref388607849

Quick Start Guide imagotag GmbH
Page 16 of 36
The AP-2010 supports 11 wireless channels. It’s recommended to choose one of
the recommended channels: 3, 5, 8, 9 or 10. These channels do not interfere with
standard Wi-Fi channels 1, 6, 11 and are scanned by the labels more often For
further information about selecting channels see point Connect and configure
Access Point AP-2010.
4.3 Necessary configuration at the ESL Client
After the configuration in the AP-2010 web management interface it’s necessary to add this AP
via the ESL Client: System – Access Point Configuration – New …
FIGURE 1-14: ESL Client AP configuration - System -> Access Pont Configuration -> New
Choose “Manual Configuration” if you don’t use Auto-Config and enter Access Point ID (AP ID)
and IP address (Host).
Note: After the basic configuration in the AP-2010 web management interface, it is also possible
to fill in AP-ID and AP-IP-Address automatically. For this choose "Create Configuration..." under
System – Access Point Status - Right click on the discovered and configured Access Point.
After saving the AP configuration you should see the AP under System – Access Point Status as
ONLINE. In addition the AP status LED should turn BLUE.