
Operator`s manual


MAINTENANCE
RC12 03/09 Maintenance Section 5-8
© 2009 Alamo Group Inc.
MAINTENANCE
TOP DRIVE ASSEMBLY SERVICING
To replace outboard bearing, remove belt and top pulley assembly as outlined in Maintenance Section, page 5-
6. Clean all burrs from shaft and remove bearing and lock collar as outlined in Maintenance Section, page 5-6.
Inner bearing can be replaced either by following above procedure and sliding shaft outward or by unbolting
entire drive assembly.
Note: On 20' models, pulley shaft is stepped down at bearing journals and cannot be slid through without
unbolting bearing assembly.
To replace inner bearing or top drive u-joints, first remove belt , pivot bolts and inboard mount weldment before
sliding entire assembly toward pulley side. It may be necessary to remove set screws which lock top shaft to
pulley shaft. There are no locking screws located on spline side by gear box.
DRIVELINE
Driveline Shield Replacement
Slide apart both halves of driveline and remove shield by unfastening nylon bearing retainer. The Snap ring
can be removed by inserting screwdriver under on end. Snap ring may also be accessed through slots in side
of shield by bell-end. Always replace nylon bearing kit when installing a new shield. When assembling both
portions of driveline, align phase key on end of square shaft half with groove in tube side.
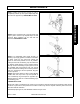
Step 1: To disassemble the universal joint, remove
the four snap rings. FIGURE Mnt-FL-0032.
Step 2: With snap rings removed, support drive in
vise, hold yoke in hand and tap on yoke to drive cup
up out of yoke. FIGURE Mnt-FL-0033.