
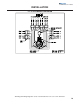
Troubleshooting guide

16
Installation and Service Manual
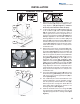
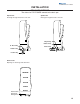
Touchpad
Selection
Areas
Water Valve
Control
Board
LED
Syrup
Injection
Shroud
Program
Button
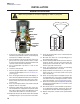
INSTALLATION
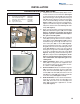
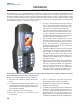
BRIXING PROCEDURE
NOTE:
This procedure is for flavors requiring 5:1 water to syrup ratio.
CC OZ
OZ C C
45
40
35
30
25
20
15
10
5
1
11: 1
5:1
225
8
7
6
5
5:1
RATIO
RATIO
4
3
2
1
4.75
11: 1
200
175
150
125
100
75
50
50
Funnel and 5:1 Brix Cup
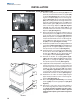
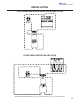
1. Connect water and syrup to system and purge lines
at both the syrup and water valves to assure that syrup
and water are available at the valves.
2. If the front panel is on the front of the unit, remove it to
gain access to the syrup and water valves. In order
to remove the front panel, the grid, splash shield, and
cosmetic nozzle must be removed first.
3. Use a standard brix cup with a 5:1 ratio for the
procedure.
4. Locate the control board.
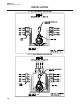
5. Press the program button until 1 is displayed on the
control board LED display.
See the Control Board Pro-
gramming pages
.
6. Press the program button until the LED displays 3.
This is the water adjustment mode on the circuit board.
7. Place the brix cup with the water side of the cup un-
der the nozzle of the water valve (located in the cen-
ter of the unit.
8. Press any touchpad selection area and the valve will
dispense water for 3 seconds.
9. Check the output volume of water. The correct vol-
ume should be 6 oz. If adjustment is needed to attain
this volume, adjust the water side adjustment screw
on the water valve until 6 oz. (177 ml) is present.
10. Repeat the above steps until the water valve is brixed
and dispensing 6 oz. (177 ml) of water in 3 seconds.
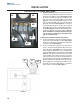
11. Press the program button on the control board until
the LED displays 4.
12. Note that each flavor has a corresponding port on
the syrup injection shroud.
13. Use the funnel provided with the FT unit to direct the
syrup into the brix cup. Place the funnel under the
syrup injection shroud and the outlet of the funnel
into the syrup side of the brix cup.
14. Press any touchpad area and the corresponding
syrup will be dispensed for 3 seconds.
15. Syrup should be even with the 6 oz. (177 ml) water
mark on the cup or at the 35cc mark on the syrup
side of the brix cup.
16. Check each syrup position and adjust syrup on the
corresponding valve as necessary. A plumbing label
is located on the unit showing the position of each
valve and syrup port.
See the Plumbing Diagram page
.
17. Return the control board to the dispense position by
pressing the program button for 3 seconds or until
the LED displays 0.
18. Check each flavor to assure that both syrup and wa-
ter are dispensing properly and that the flavor that
corresponds to the flavor label is being dispensed.
19. Replace front panel, cosmetic nozzle, splash shield,
and grid.