
Operation Manual


234 Adding Hyperlinks and Interactivity
Creating variant source images
For each object with at least one activated rollover state, you'll need to provide
a source image. It's the often subtle differences between the Normal image and
the "variants" that make the object appear to switch from one state to another.
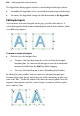
For example, if you've checked the "Over" state for an object, you need to
include a variant image that the Web page can display when the button is
moused over. In the following example, two variants of a Home button are
shown—one showing the button highlighted (on mouse over), and a second
image in its default Normal state.
You'll need to create these source images in a separate image-editing program.
Here are some things to consider:
• Variant images will stretch to fit into the region occupied by the Normal
image, so all the source images should have the same dimensions.
• Make sure the variants are all in precise registration with the Normal
image, so there's no unintended movement when images are swapped on
rollover. To simplify matters, use an image editor with layering capability
and create each variant on a separate layer directly above the Normal
image.
• WebPlus displays only the Normal image, so preview the effect of
swapping graphics by hiding and showing layers in the image editor.
• You only need to provide variant source images for the rollover states
you've activated.
• Once you're satisfied with the source images, export each layer to a
separate file, and then return to WebPlus to define the rollovers.