
Operation Manual


Colour, Fills, and Transparency 221
Transparencies work rather like fills that use "disappearing ink" instead of
colour. The more transparency in a particular spot, the more "disappearing"
takes place there, and the more the object(s) underneath show through. Just as
a
gradient fill can vary from light to dark, a transparency can vary from more
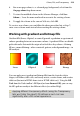
to less, i.e. from clear to opaque, as in the illustration:
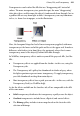
Here, the hexagonal shape has had a Linear transparency applied, with more
transparency at the lower end of the path and less at the upper end. It makes a
difference which object is in front (here, the pentagon); where there's more
transparency, more of the object(s) behind will show through.
In WebPlus, transparency effects work very much like greyscale fills. Just like
fills...
• Transparency effects are applied from the Studio—in this case, using the
Transparency tab.
• The Transparency tab's gallery has thumbnails in shades of grey, where
the lighter portions represent more transparency. To apply transparency,
you click thumbnails or drag them onto objects.
• Most transparency effects have a path you can edit—in this case, with the
Transparency Tool (see WebPlus help).
As for the effects available on the Swatches tab, all are comparable to the fills
of the same name:
• Solid transparency distributes the transparency equally across the object.
• Gradient transparencies include linear, elliptical, and conical effects.
• The Bitmap gallery includes texture maps based on the Swatches tab's
selection of bitmaps.