
Operation Manual


Images, Animation, and Multimedia 195
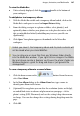
Adjustments are applied such that the most recently added adjustment always
appears at the bottom of the list and is applied to the picture last (after the
other adjustments above it). In the above example, the Diffuse Glow effect is
applied to the picture first, followed by Levels.
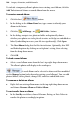
To add an image adjustment:
1. Select the picture that you want to apply an adjustment to.
2. Click the
button on the Picture context toolbar.
3. In the Image Adjustments dialog, click
Add Adjustment.
4. From the drop-down list, select an adjustment. The adjustment is added
to the scrollable window.
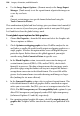
5. Select the adjustment. There are three methods to configure properties
depending on the adjustment selected:
Adjust settings by moving available sliders (if present)
OR
Enter different values into the input boxes.
OR
For more complex adjustments, make changes in a pop-up dialog
(click Advanced Properties to access).
NOTE: Some adjustments have no properties and are applied directly as
they are selected.
6. Click the OK button.
Add more than one adjustment to the picture by repeating the above
procedure.
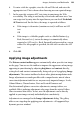
To delete an image adjustment:
• With an adjustment selected, click the button.
Switching on/off adjustments
In the same way in which a layer's contents can be made visible/invisible,
the Mute button can be used to temporarily make an adjustment invisible or
visible.