
Operation Manual


Editing Objects on the Page 155
Snapping
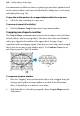
The Snapping feature simplifies placement and alignment by "magnetizing"
grid dots and guide lines. When snapping is on, the edges and centres of
objects you create, move, or resize will jump to align with the nearest visible
grid dot or
guides. Objects normally snap to the page edge, too.
Guide lines include ruler guides as well as layout guide lines based on page
margins, rows, and columns (see
Using layout aids on p. 44).
You may notice that with snapping enabled, when you move a guide, any
"snapped to" objects will move with the guide. This object "stickiness" is
enabled by default (with the
Sticky Guides feature) but can be disabled
permanently or temporarily as necessary (in Tools>Options>Layout). It is
especially useful for selectively repositioning objects in bulk by guide
movement, without any unnecessary grouping operations.
To turn snapping on and off:
• Click the Snapping button on the Hintline. When the button is
down, snapping is on.
Selective snapping
You control which points and lines are snapped to by showing or hiding the
individual guide elements (i.e., Rulers, Guide lines, Frames, Dot Grid, etc.),
and by changing options settings for those visible elements.
To show or hide guide elements:
• Enable (or disable) the element name's button on the View menu.
To set which visible elements are snapped to:
1. Choose Options... from the Tools menu, and select the Snapping option.
2. Check the "Snap to:" box, then check/uncheck the elements you want to
snap to. The choices include Grid dots, Page/Bleed edge, Page margins,
Ruler guides, Row/column guides and Nearest Pixel.