
Operation Manual


136 Working with Tables
For calendar-specific properties, a context toolbar lets you change an existing
calendar's month/year, modify calendar-specific properties, and manage
calendar events (both
personal and public holidays).
You can update calendar details throughout your Web site via Set User
Details—in the same way that you'd set up the date (along with the time) on
some alarm clocks. This is especially useful if you want to update the year on a
year-to-view Web page, composed of 12 monthly calendars—you only need to
change the year in one place.
To insert a calendar:
1. Click the Table flyout on the Standard Objects toolbar and choose
Insert Calendar.
2. Click again on your page, or drag out to indicate the desired size of the
calendar.
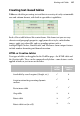
3. From the displayed Calendar Wizard, define options for your calendar
including setting the year and month, calendar style (square, or in single
or double column format), week start day, room to write, display
options, switching on personal events/holidays, and calendar format.
To have your country's public holidays shown, check Add public holidays
in the wizard and select a Region from the associated drop-down menu.
To add personal events, check Add personal events additionally.
4. Click Finish to complete the wizard.
To edit a selected calendar's properties:
1. Click the Edit Calendar button on the Calendar context toolbar.
OR
Right-click on a selected calendar, and choose Table>Edit Calendar....
2. Choose an appropriate tab (Date, Style, Events, etc.) and make your
modification, then press OK.
Right-click on a calendar and choosing Table lets you select, insert, distribute,
and delete rows and columns, but take care not to corrupt your table
formatting!