
Operation Manual


134 Working with Tables
• To merge cells into larger cells that span more than one row or column
(for example, a column head), select a range of cells and choose Merge
Cells from the Table menu (Table>Merge Cells from the right-click
menu). The merged cell displays only the text originally visible in the
top-left selected cell. The original cells and their text are preserved,
however—to restore them, select the merged cell and choose Separate
Cells from the Table menu (Table>Separate Cells from the right-click
menu).
To merge all cells in an individual column or row, click the column or
row header's button, choosing Merge Cells. Do the equivalent with
the Separate Cells command to split cells.
• To copy cells (including text, formatting, borders, and colours) to a
new cell in the same table, select the cell(s), press the Ctrl key and hover
over the cell border(s) until the copy cursor is shown—click and drag the
copied cell to its new cell location. Alternatively, select the cell(s), Copy
and then Paste (both via the Edit menu) into a new cell while holding
down the Shift key.
• To apply a coloured background to a whole table, hover over the top-left
hand corner of the table until you see a cursor—click once, and
then use the Colour tab or Swatches tab to apply a colour fill. (See
Applying solid colours on p. 213).
• To apply a coloured background to specific cells, select the cell(s) and
again use the Colour tab or Swatches tab to colour the cells.
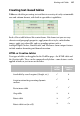
Using AutoFormat
To use style presets to customize the table's appearance:
• Choose AutoFormat... from the Table menu (Table>AutoFormat...
from the right-click menu). The dialog presents a list of sample tables,
which differ in their use of Lines (inner and outer cell borders), Fill (cell
and table), Font (bold, italic, etc.), Alignment (left, centre, etc.) and
HTML editing support.