
Operation Manual


132 Working with Tables
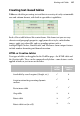
• To format numbers and insert formulas, switch on the Spreadsheet
functions button on the Table toolbar. See online Help for more
information.
To change the table's structure and appearance:
• To select a cell, click on the edge of the chosen cell. To select more than
one cell, click in one cell and drag across the others, one row or column
at a time.
• To adjust row or column size, drag the control button shown
when hovering over the separating lines in the table row or column
headings. Note that you can adjust a row's height independent of the
amount of text it contains. For absolute row/column sizing, choose Set
column width(s) or Set row height(s) from the Table menu (or use the
right-click menu). For individual columns, click the column or row
header's button, choosing Set width or Set height. You can resize
your columns without affecting the overall table width by adjusting the
column heading with Ctrl-drag.
• To distribute rows or columns, select the entire table or just a selection
of rows or columns, then choose Evenly Distribute from the Evenly
distribute>Rows or Evenly distribute>Columns from the Table menu
(or use the right-click menu). To honour table width, a cell's text may
wrap when distributing columns.
To evenly distribute rows in an individual column, click the column's
button and choose Evenly Distribute Rows. Conversely, use the
equivalent button (and Evenly Distribute Columns command) at a row
header to distribute columns on the chosen row.