
Operation Manual


86 Working with Hyperlinks and Interactivity
(1) Start by selecting a navigation bar from the Themes tab, then
customize it to include the necessary buttons and to look the way you
want.
(2) Incorporate it on the pages of your site, preferably on the master
page layer.
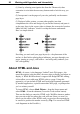
(3) Design a bullet, pointer, or some other graphic (one that
complements the color and design of your navbar buttons) and paste it
on the page layer in the correct place to denote the current site location.
Make sure this “indicator” doesn’t overlap the button underneath.
Here’s a simple sketch:
Providing you wait until your page layout (i.e. the placement of the
navbar) is final before placing these indicators, one pass through your
pages, pasting as you go, will suffice—and will greatly enhance your
site’s navigability.
About HTML and Java
HTML, of course, is the language “behind” basic Web pages—the
actual descriptive code that tells a browser what to display and where to
display it. While WebPlus doesn’t support full-fledged HTML editing,
it does allow you to add extra HTML code to a page. Using this
approach, you can include HTML and JavaScript fragments generated
by another application, copied from another Web page, or perhaps that
you’ve written yourself.
To insert HTML, choose Web Objects... from the Insert menu and
select HTML... from the submenu (or use the Tools toolbar button).
Then use the dialog to enter the HTML code. WebPlus inserts a marker
into your site at the site where the code will run. Since you won’t be
able to see the effect of the HTML until you preview the exported site,
be careful to position the marker correctly. (Tip: You can store HTML
code fragments in the Portfolio.)