
Operation Manual


84 Working with Hyperlinks and Interactivity
Click slightly to the upper left
of the lion, then drag down
and right to draw a box. (You
can adjust it later.)
When you release the mouse
button, the familiar Hyperlinks
dialog appears, waiting for you to
provide a target.
Select A page in your site and designate “Contact Us” in the
drop-down list. Click OK.
Another approach to creating hotspots is to match a hotspot to an
existing shape. Simply create the shape (see Chapter 5) and draw a
hotspot as explained above. Then select both objects and choose Fit
Hotspot to Shape from the Tools menu. The hotspot instantly
conforms to the shape! The two objects will still be separate, so you
can easily delete the shape if it’s no longer needed.
If necessary, you can use the Pointer tool to move or resize a hotspot,
like any graphic. There’s no limit to the number of hotspots you can
use. You can also add extra nodes to a hotspot, allowing it to be fit into
any irregular region; there’s more on this in online help.
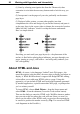
Rollover graphics combine several images with HTML code in such a
way that a different image appears (or some other event is triggered)
depending on how the user’s mouse “rolls over” the object. For
example, a rollover button might appear “down” or “up” depending on
whether the user’s mouse was over it. A number of theme graphics
exhibit rollover behavior.
To create your own rollovers in WebPlus, you’ll first need to import a
layered graphic created in a separate graphics program, such as Serif
DrawPlus. Each layer will contain a separate picture for a particular
“state” of the button object. WebPlus then lets you define the rollover
behavior, automatically generating the necessary event-trapping code
for the states you define. For details, consult online help.