
Operation Manual


18 Getting Started
Before proceeding, choose Save... from the File menu and save
the project file, providing a file name of your choice (perhaps
H
ANDSON.WPP, which is how we’ll be referring to this site
throughout the Companion). Note that saving the WebPlus (.WPP)
project file is not the same as publishing it as a Web site.
Take a look around
Let’s take a few moments to examine the site we created from the
template. In the process, you’ll become familiar with some of the basic
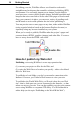
features of the WebPlus environment. Your screen will look something
like this:
The workspace consists of a page area (where you put the text,
graphics, and other elements you want to appear on the final Web page)
and a surrounding pasteboard area (where you can keep elements that
are being prepared or waiting to be positioned on the page area).
Move the mouse pointer around the screen and you’ll see popup
tooltips that identify toolbar buttons. Watch the HintLine toolbar
at the bottom for capsule descriptions of each feature: helpful data
and hints when there’s an object selected, and hints about buttons
and menus at other times.
Try right-clicking any object or page region to bring up a context
menu of functions... the choices probably seem overwhelming at
this point! To access online help, you could press F1 or choose
WebPlus Help from the Help menu—but for now, stick with the
guided tour.
Standard, Arrange
& View toolbars
Text & Frame toolbars
Studio
(Site tab shown)
Tools toolbar
Attributes toolbar
HintLine toolbar
ChangeBar