
Operation Manual


Previewing, Publishing, and Maintaining the Site 95
Publishing to a local folder
This option, like previewing, exports your project’s pages to HTML
and graphics files. The key differences are:
♦ You designate exactly where the files should go, instead of having
them written out to temporary files, which are not really under
your control. As noted above, each time you use Preview, even if
you’re only previewing one page, your previous set of temporary
files disappears.
♦ You can publish selected pages, rather than just (as when
previewing) all or one.
♦ Your Web browser doesn’t launch automatically. Instead, you’re
given the option of launching it. If it’s already open, simply
decline the option, then switch to your browser’s window and use
its Reload or Refresh command to display the updated page.
Publishing to a local folder is another way of previewing your Web
site, and is also the way to share your site with others on a local area
network. You don’t need to try it right now, but here are the steps
involved in publishing to a local folder:
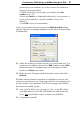
Click the
Publish Site to Disk Folder button on the top
toolbar. In the dialog, locate the folder where you wish to store the
output files, or create a new folder.
In the Page Range tree, select which page(s) to publish, then click
OK.
Once the publishing process is completed, accept or decline the
option to launch your Web browser.