
Operation Manual


30
Working with Text
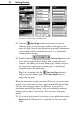
Notice the gray Link button on the selected frame’s bottom edge. The
button’s icon tells you about the frame and the story text it contains:
A square (as on the name/address frame) indicates a
frame with all its text displayed—either a standalone
frame or the last frame in a linked sequence.
A plus sign (as on the “Here’s the place” frame) shows
there’s more text in the story than the frame can display.
Extra text is stored in an invisible overflow area. You
can either make the frame larger or shorten the story.
A down arrow shows that the frame’s text continues into
a following linked frame.
Objects on the master page
Let’s take a brief detour to review a key WebPlus concept (covered in
QuickTour 2)...
Y Click the “Company Name” heading at the top of the page.
Nothing happens! Why not?
Y Click (once) on the
&XUUHQW3DJH box at
the lower left. The screen display changes and the box now
indicates you’re working on the master page.
You can think of the master page as a background that’s shared
between all the pages of your site. When you switch to the master page,
objects on the page vanish, leaving only background objects. In this
case, that includes the heading and slogan (together in one text frame),
a graphic at the upper right, and six blocks of free text, each serving as
a hyperlink to other site pages. These are the common elements the
designer of this particular Wizard has determined should appear on
each page of the site.
Y While we’re on the master page, click a couple of the free text
blocks (e.g. “Welcome” or “About Us”) and note that they, like
text frames, display handles when selected. Unlike text frames, you
don’t see an outline around a selected free text object.
Y Now click the &XUUHQW3DJH box again (once only) to return to the
page layer.