
Operation Manual


Working with Text 29
Now that you’ve reviewed the pages the Page Wizard provided, and
had a chance to revise Wizard “answer text” using the Studio, it’s time
to look at how to add standard text and change the layout of text on the
page. It’s really not complicated at all.
Two kinds of text
Text in WebPlus is always contained in a box called a text object, and
you can drag these boxes (and their text) around to position them
anywhere on the page. The two kinds of text object are frame text and
free text.
♦ A free text object is always one box, standing alone. It’s ideal for
captions, labels, buttons, or short paragraphs.
♦ Frame text goes in a special box called a frame. Two or more
frames can be linked together so the enclosed text flows from the
first frame to the second, and so on—like a newspaper article with
multiple columns. Whether there’s a single frame or more than
one, the enclosed frame text is called a story. As a rule, choose
frames for body text with longer paragraphs.
Let’s begin by seeing how the Page Wizard has
utilized frame text.
Y Display your Home page (double-click the
3UHYLRXV3DJH
button if necessary), and adjust the screen view so you can read the
page text.
Y Click the
button at the top of the left toolbar.
You’ve just selected the Pointer tool—the basic tool for selecting,
moving, and resizing objects, including the boxes that contain text.
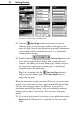
Y Using the Pointer tool, click the block of address and contact
information at the lower right.
Y Now click the paragraph starting with “Here’s the place...” just
below the page title.
In each case, clicking selects a text frame, displayed as a rectangle with
a blue outline and small black “handles.”