
User Manual
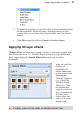
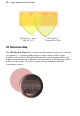


Image Adjustments and Effects 75
• 3D Lighting provides a "light source" without
which any depth information in the effect wouldn’t be
visible. The lighting settings let you illuminate your
3D landscape and vary its reflective properties.
To apply 3D Effects:
• Click Add Layer Effects on the Layers tab and check 3D
Effects in the Layer Effects dialog. Adjust the "master control" sliders
here to vary the overall properties of any individual 3D effects you
select. Blur specifies the amount of smoothing applied. Larger blur
sizes give the impression of broader, more gradual changes in
height.Depth specifies how steep the changes in depth appear. The
button is normally down, which links the two sliders so that sharp
changes in Depth are smoothed out by the Blur parameter. To adjust
the sliders independently, click the button so it's up (not blue).
• Check a 3D effect in the 3D Effects list which reflects the 3D effect
you can achieve. Procedures for each are detailed below.
Transparency
The uniform transparency of a layer and its objects (with 3D layer effects
applied) can be controlled via the Layers tab with the Opacity option (see rear
heart shape in example below). However, for more sophisticated transparency
control, transparency settings can instead be set within the Layer Effects dialog.
The effect can be used to create more realistic transparency by independently
controlling transparency on reflective (edges) and non-reflective (flat) areas of
the object (see front heart shape below).
Use this effect in conjunction with reflection maps and multiple
directional light sources for ultra-realistic glass effects.