
User Manual


Layers and Masks 41
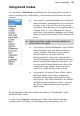
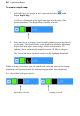
To create a mask:
1. Select a layer in the Layers tab. This is the layer where you want to
create the mask, and select specific region(s) if desired.
2. Then either:
• Click the Add Layer Mask button to create a Reveal All
mask (or Reveal Selection if there is one). Instead, Alt-click the
button for a Hide All Mask (or Hide Selection).
OR
• Choose Mask>Add Mask from the Layers menu and then one
of the following from the submenu:
• Reveal All for a transparent mask over the whole layer
• Hide All for an opaque mask over the whole layer
• Reveal Selection for an opaque mask with transparent "holes"
over the selected region(s)
• Hide Selection for a transparent mask with opaque "blocks"
over the selected region(s)
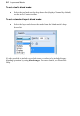
On the Layers tab, a mask preview thumbnail appears, confirming that a mask
exists.
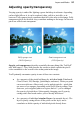
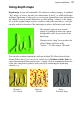
Editing on the mask
When you create your mask you immediately enter Edit Mask mode, where you
can use the full range of painting tools, selection options, flood fills, gradient
fills, and effects to alter the mask's grayscale values. These manipulations cause
corresponding changes in opacity, which in turn changes the appearance of the
pixels on the layer itself.
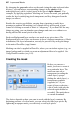
The image window's titlebar shows "Mask", indicating that a mask is currently
being edited. The Color tab switches to Grayscale mode when you're editing a
mask, and reverts to the previous setting when you exit Edit Mask mode. This
means anything you paste from the Clipboard onto the mask will automatically
be converted to grayscale.