
User Manual


40 Layers and Masks
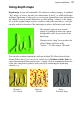
By changing the grayscale values on the mask (using the paint tools and other
devices), you can impose corresponding changes in the opacity of the
underlying layer's pixels (values stored as the layer's alpha channel) . For
example, by applying a gradient "blacking out" across the mask, you gradually
render the layer's underlying pixels transparent, and they disappear from the
image (see above).
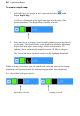
Besides the creative possibilities, ranging from vignetting to multi-layer
montage to gradient-fill masking (see example above) and beyond, a great
feature of working on a mask is that it is "temporary". If you don't like the way
things are going, you can abandon your changes and start over without ever
having affected the actual pixels on the layer!
Each non-Background layer can have one mask at any given time. (The
Background layer can’t have one because it doesn’t support transparency.) Mask
information, like layer information, can only be preserved by saving the image
in the native PhotoPlus (.spp) format.
Masking can also be applied in PhotoFix, where you can isolate regions (e.g., an
image background) to which you want an adjustment filter to be applied. See
Using PhotoFix masks (see p. 62).
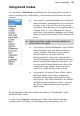
Creating the mask
Before you can use a
mask, you have to create it
on a particular layer. The
mask can start out as
transparent (revealing the
whole layer), opaque
(hiding the whole layer), a
transparency gradient
(opposite) or—if you
create it from a selection—
a bit of both (with only the
selected region hidden or
revealed). The mask shows
as a mask thumbnail.
The choice depends on how you want to work with the layer's contents. By
darkening portions of a clear mask, you can selectively fade layer pixels. By
lightening an opaque mask, you selectively reveal layer pixels.