
User Manual


16 Getting Started
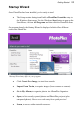
Use the Choose Workspace drop-down menu to choose your workspace
appearance (i.e., Studio tab positions, tab sizes, and show/hide tab status). You
can adopt the default workspace profile <Default Profile>, the last used profile
<Current Profile>, a range of pre-defined profiles, or a custom workspace
profile you've previously saved.
As you click on different profiles from the menu, your workspace will
preview each tab layout in turn.
If you don’t want to use the Startup Wizard again, check the "Don't show this
wizard again" box. However, we suggest you leave it unchecked until you’re
familiar with the equivalent PhotoPlus commands. Switch the wizard back on
again by checking Use Startup Wizard via Preferences... (General menu
option) on the File menu.
Starting from scratch
PhotoPlus lets you create an image based on a pre-defined canvas size (e.g., 10 x
8 in). Different canvas size options are available from a range of categories
(International/US Paper, Photo, Video, or Web). Alternatively, you can create
your own custom canvas sizes, and even store them for future use. For either
preset or custom sizes, the resolution can be set independently of canvas size.
To create a new image (using Startup Wizard):
1. The first time you launch PhotoPlus, you'll see the Startup Wizard,
with a menu of choices. Click Create New Image.
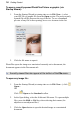
2. In the New Image dialog, you can either:
1. For a preset canvas size, select a suitable Category from the
drop-down list. Categories are named according to how your
image is intended to be used, e.g. pick a Photo category for
photo-sized canvases.
2. Pick a canvas Size from the drop-down list.
OR
• For a custom canvas size, enter your own Width and Height. If
the dimensions are non-standard, the Size drop-down list will be
shown as "Custom." For future use, save the custom size with
Add Size... (from the button) if necessary.