
User Manual


198 AlbumPlus Organizer: Getting Started
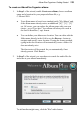
5. Specify a Destination Folder for your photos to be copied to. You can
either edit the Folder name in the field or use the Browse... button to
navigate and specify a new location, e.g. C:\Photos\2010\.
6. Click OK.
This copying process may also retrieve archived photos back into
your current working environment.
Autoplay
Your computer may have Autoplay enabled which means it will be able to
detect any new photo content being introduced to your computer from
removable devices, e.g. when a CD/DVD is inserted into your CD/DVD reader,
or when you plug in a USB flash drive. A dialog box will automatically be
displayed, irrespective of whether AlbumPlus Organizer is open or not.
1. Select the option Import Media into Photo Album. AlbumPlus
Organizer is launched automatically if not already loaded.
2. The Add Photo(s) dialog is displayed to allow your photos to be
added. Note that AlbumPlus Organizer has detected the removable
disk automatically.
3. Follow the procedure described in To add photos from a hard disk. A
log is made of any additions to your album so you can view photos
added on specific dates. See Searching By Import History on p. 233.
Import reports
Adding photos is a simple process. However, you may encounter some issues
during file addition which may require resolution, i.e.
• Duplicate Photos: A photo you are trying to add will not be added
because it already exists in your album. The duplicate check is based
on the file content and not the file name, type or path.
• Corrupt Photos: The added photo is corrupt and will not be added to
your album. An example would be a WMF file with invalid header or
excessive dimensions.
• Invalid Imports: The format of the photo means that it cannot legally
be decoded by AlbumPlus Organizer.