
User Manual


AlbumPlus Organizer: Getting Started 193
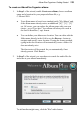
To create an AlbumPlus Organizer album:
1. In Step 1 of the wizard, enable Create new album, choose an album
name and a location for your proposed album file, e.g.
C:\Photos\2010\.
• Your album name is based on a standard prefix "My Album" and,
if the album name already exists, an additional "[0]", "[1]", "[2]"
etc. Of course, you can replace the album name with your own
choice—as we’ll see later. Your album will always be saved in
the Serif AlbumPlus (*.sap) format.
• You can define your album save location. You can either edit the
folder name directly in the field or use the Browse... button to
navigate and specify a new location. If using the former method,
typing in the new location will automatically create a folder if it
does not already exist.
The directories will be created for you automatically if not
already present. Click Next>>.
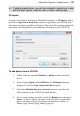
2. In Step 2 of the wizard, you can choose to search for media files for
inclusion in your album immediately.
To add media straight away, click the "Yes" radio button.