
User Manual


Printing and Exporting 187
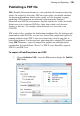
To open the Export Optimizer:
1. Click Export Optimizer... from the File menu.
2. From the Export Optimizer dialog, use the Options section to specify
the file Format, and format-specific options such as bit depth,
dithering, palette, and compression. The Size section lets you scale,
stretch, or squash the image, while setting an export Quality setting
(e.g., a resampling method such as Bicubic).
3. Review your optimized image, and when you're happy with it, click
Export. The Close button will instead abort the export but save any
format-specific option changes made in the dialog.
4. From the Export dialog, enter a file name, and choose a file format
from the drop-down list. The export format and custom settings will
be remembered for future exports. Click OK.
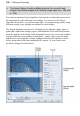
To adjust the preview display:
• To change the display scale, click the dialog's Zoom Tool and
then left-click (to zoom in), right-click (to zoom out) on the preview,
or choose a zoom percentage in the lower left in the drop-down list.
You can also select a specific area by dragging a marquee around an
item of interest.
• To display a different portion of the image, first select the Pan
Tool, then drag the image in the active preview pane.
• Click one of the View buttons shown below the
preview pane to select Single, Double, or Quad display. The multi-
pane (Double and Quad) settings allow for before-and-after
comparison of export settings.
To compare export settings:
1. Set the preview display for either Double or Quad view.
2. Click one of the preview display panes to select it as the active pane.