
User Manual


152 Making Images for the Web
To edit a hotspot:
1. Click the Image Map Tools flyout and choose the Image Map
Selection tool.
2. Select your hotspot on the page, which then offers you several editing
options.
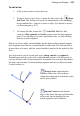
• To resize the hotspot, drag the displayed square nodes.
• To move the hotspot, drag from the center.
• Right-click the hotspot to set hotspot Properties.... Enter hover-
over Text and add an associated target URL. Previously used
URLs are saved and can be selected from the drop-down list by
clicking on the arrow at the end of the box. On export, entered
text will pop up when the cursor moves over the hotspot.
The right-click menu also lets you order overlapping hotspots and to
Delete selected hotspots.
To export an image map:
• When exporting via Export Optimizer, export the image for which you
have created the image map as a GIF (for non-photographic images)
or a JPG (for photographic images). Ensure the Create HTML for
Image Maps box is checked on the second Export dialog.
The output consists of an image file and an HTML file with the same base name.
The HTML file contains the tags for the image map, ready to be pasted into the
source code for the web page.