
User Manual


Manipulating Images 107
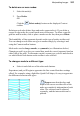
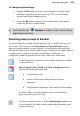
To deform the mesh systematically:
1. Shift-click or drag a marquee to select multiple nodes.
2. Click the Deform Mesh button on the Mesh Warp Tool's
Context toolbar. A red selection rectangle appears around the
designated nodes (you may need to zoom in to see this), with a fixed
point in the center and handles at its corners, sides, and center.
• To deform the mesh region, drag from any corner or midpoint
handle.
• To rotate the mesh region, drag from just outside any corner
handle.
• To move the fixed point, move the cursor over the fixed point
symbol until the cursor changes, then drag (this then lets you
perform arc rotations). To move the entire region, drag from
elsewhere within the region.
• Watch the Hintline for details on many key-assisted options such
as skew, squash/stretch, and perspective effects. In this respect,
the tool works almost exactly like the regular Deform Tool (see
p. 101).
3. Click the button again to return to standard mesh warping.
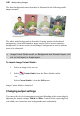
Using Image Cutout Studio
Image Cutout Studio offers a powerful integrated solution for cutting out part
of an image on an active Background or standard layer. In doing so, you can
separate subject of interests from their backgrounds, either by retaining the
subject of interest (usually people, objects, etc.) or removing a simple uniform
background (e.g., sky, studio backdrop). In both instances, the resulting "cutout"
creates an eye-catching look for your image, and lets you present cutouts layer-
by-layer—great for simulating subject/background combinations and artistic
collages.