
Operation Manual


246 Printing your Publication
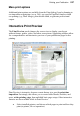
To set up your printer or begin printing:
1. Click Print on the Standard toolbar. The Print dialog appears.
2. Select a currently installed printer from the Printer drop-down list. If
necessary, click the Properties button to set up the printer for the
correct page size, etc.
3. Select a printer profile from the Profile drop-down list. You can just
use Current Settings or choose a previously saved custom profile
(.ppr) based on a combination of dialog settings; Browse... lets you
navigate to any .ppr file on your computer. To save current settings,
click the Save As... button, and provide a unique profile name. The
profile is added to the drop-down list.
4. Select the number of copies to print, and optionally instruct the printer
to Collate them.
5. Select the print Range to be printed, e.g. the Entire Publication,
Current Page, or range of pages. For specific pages or a range of
pages, enter "1,3,5" or "2-5", or enter any combination of the two.
To print selected text or objects, make you selection first, then choose
Current Selection appearing in the Range drop-down list after
selection.
Whichever option you've chosen, the Include drop-down list lets you
export all sheets in the range, or just odd or even sheets, with the
option of printing in Reverse order.
6. Set a percentage Scale which will enlarge or shrink your print output
(both page and contents). A 100% scale factor creates a full size print
output. Alternatively, from the adjacent drop-down list, choose
Shrink to Fit to reduce your publication's page size to the printer
sheet size or Scale to Fit to enlarge or reduce the publication page size
as required.
4. Keep Auto Rotate checked if you want your publication page to
automatically rotate your printer's currently set sheet orientation.
When you access the Print dialog, if page and sheet sizes do not
match, you'll be prompted to adjust your printer sheet orientation
automatically (or you can just ignore auto-rotation).
5. Click Print.