
Operation Manual


Colour, Fills, and Transparency 237
3. Choose the fill type and the desired fill category. Note that you can
also use the dialog to apply a solid fill.
• For gradient fills, select Gradient from the Type drop-down
menu, and pick a gradient preset. A two-colour gradient has two
nodes, one at each end of its path.
- or -
Click the From and To buttons to specify the gradient's start and
end colours.
- or -
Click the Edit button if you want to add or subtract key colours
from the currently chosen gradient, apply different key colours to
individual nodes, or vary the overall shading of the effect.
• For bitmap fills, select Bitmap from the Type drop-down menu,
choose a category, and then click a gallery swatch.
4. Click OK to apply the effect or fill to the object.
Editing the fill path
When you select a fillable object, the Fill Tool becomes available (otherwise it's
greyed out). When you select the Fill Tool, if the object uses a gradient fill,
you'll see the fill path displayed as a line, with nodes marking where the
spectrum between each key colour begins and ends. Adjusting the node
positions determines the actual spread of colours between nodes. You can also
edit a gradient fill by adding, deleting, or changing key colours.
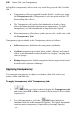
Linear Fill based
on key colours (A)
Filled object
showing fill path
(B)