
Operation Manual


Creating Animations 237
Keyframe object control
We've just looked at storyboard control. However, a whole series of important
object control tools are also available in keyframe animation. They are available
on an object toolbar, displayed in-context under any selected object.
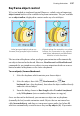
Initial grouped objects show run
forward, and grouped object buttons
Objects along the animation run show
buttons for conversion to key objects,
and object placement and attributes
buttons in both directions.
The insertion of keyframes when you begin your animation will automatically
run objects forward or backward. However, Run Forward and Run Backward
commands let you introduce new objects in your animation which run across a
limited number of keyframes or the entire storyboard.
To run object(s) forward/backward:
1. Select the keyframe which contains your chosen object.
2. Select the object, then click Run forward (or Run
backward if on a later keyframe), located on the object toolbar directly
under the selected object.
3. From the dialog, choose to Run Length either To end of storyboard
or by N Keyframes (enter a number of keyframes to copy to).
Once run forward or backward, you can move an object on any keyframe
(normally the last) to make animation work. Objects that are not moved are
called tweened objects, and show as transparent square nodes (see below; B)
which are automatically created between any two key objects (A). If you move