
Operation Manual


220 Applying Special Effects
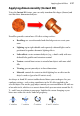
simple cubes to illustrate a simple isometric projection compared to some more
advanced projections.
Isometric
(30,90,30)
Dimetric1
(37,90,37)
Trimetric 1
(12,90,23)
Notice how the displayed angles on each of the above projections are shown
after each name.
Practically, projection drawing can be challenging as it's
sometimes difficult to visualize objects that appear three
dimensional. To aid drawing, you can use the snapping
grid which shows automatically in the page background;
the grid intelligently switches to the current plane that
you're working on. Whichever plane is set, drawn objects
will then snap to the grid on the same plane.
To apply a Pseudo 3D projection:
1. From the Standard toolbar, click 3D Planes, then select Top
Plane, Front Plane, or Right Plane to set the plane to work on. (You'll
see the snapping grid appear which reflects the currently set plane.)
2. Click a drawing tool and drag out the object (e.g., a Quick Rectangle)
on the plane (an isometric projection is created by default).
3. All subsequently drawn objects are projected onto the currently set
plane, unless it is swapped to a different plane (select a different button
and draw a new object).
If this step-by-step process is followed, it's possible to bring together projected
objects to create a larger object which simulates 3D characteristics.
You can remove any Pseudo 3D projection by selecting No
Projection from the 3D Planes drop-down menu.