
Operation Manual


172 Fill, Lines, Colours, and Transparency
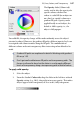
To apply gradient transparency with Transparency Tool:
1. Select an object.
2. Click the Transparency Tool on the Drawing toolbar.
3.
Click and drag on the object to
define the transparency path. The
object takes a simple linear
transparency, grading from 0%
transparency (100% opaque) to
100% transparency (0% opaque)
in the direction you drag.
You have freeform control over
where the path starts and ends,
and the direction in which the
path will be drawn. You can even
click again to redraw the path.
Editing gradient transparency
Once you've applied a transparency, you can adjust its path on the object, and
the level of transparency along the path. You can even create more complex
transparency effects by adding extra nodes to the path and assigning different
levels to each node.
You cannot alter the values in a bitmap transparency.
To adjust the transparency path directly:
• Use the Transparency Tool to drag individual nodes, or click on the
object for a new start node and drag out a new transparency path. The
effect starts where you place the start node, and ends where you place
the end node. For bitmap and plasma transparencies, the path
determines the centre and two edges of the effect.
For details of how to edit and manage gradient transparency, see DrawPlus Help.