
Operation Manual


Fill, Lines, Colours, and Transparency 167
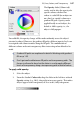
The Opacity slider (Colour tab)
can be used to alter the opacity of a
specific colour, whether that
colour is a solid fill (in an object or
on a line), or a node's colour on a
gradient fill path. Opacity can be
applied locally to each object; the
default is 100% opacity, i.e., the
object is fully opaque.
For solid fills, the opacity change will be made uniformly across the object's
interior (as above). However, for gradient fill paths, different opacity levels can
be assigned with colour to nodes along the fill path. The combination of
different colours and semi-transparency allow interesting colour blends to be
made.
Gradient fill paths are explained in detail in Working with gradient
fills on p. 159.
Don't get confused between fill paths and transparency paths. The
former is referred to here, but the latter is used to apply different
levels of transparency along a transparency path instead of colour.
To apply solid opacity:
1. Select the object.
2. From the Studio's Colour tab, drag the slider to the left for a reduced
Opacity setting (e.g., 20%); drag right to increase opacity. This makes
objects appear semi-transparent, or if set to 0%, fully transparent.