
Operation Manual


164 Fill, Lines, Colours, and Transparency
To enable the Mesh Fill Tool:
• Select Mesh Fill Tool on the Drawing toolbar's Fill flyout. With
the tool enabled, a mesh of editable patches and nodes are revealed
(above).
A mesh fill is applied to an object via the Swatch tab's Gradient gallery (see
Setting fill properties on p. 147). You can edit the mesh itself with the Mesh Fill
Tool and the accompanying context toolbar to achieve unique results. The path
lines that connect nodes in a mesh fill are actually curves, so editing the mesh is
similar to the method for Editing lines and shapes (see p. 68). Simple warping
effects, colour spread changes and path line curvature can all be affected. The
tool lets you reshape curved path lines by adjusting one or more nodes and their
control handles. In addition, the areas between four nodes called "mesh patches”
can be recoloured or moved individually or in multiples. As for curved lines you
can add, delete, and move one or more nodes at any time.
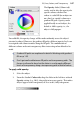
(A) Node and
(B) Patches in a mesh fill
Understanding blend modes
You can think of blend modes as different rules for combining pixels to create a
resulting colour. Note that blend modes work in relation to the colours of the
objects themselves (shapes, lines, brush strokes, and so on).
They are used for creative effects on overlapping objects, where colours blend
on top of one another. Blend modes can be applied to both a top object's line and
fill colour. You can adjust the blend mode of an existing object (brush stroke,
etc.) on your page, or you can set the blend mode before creating a brush stroke,
line, shape, etc.