
Operation Manual


140 Working with Objects
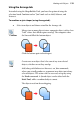
Each layer is situated along with
other layers (if present) within a
stack on the Layers tab—the
uppermost layer is applied over any
lower layer on the page. You can
also expand each layer entry for a
tree view of objects associated with
that layer (see the Sky layer
opposite). Each object entry can be
clicked to select the object in your
workspace, and you can name your
objects at any time.
The tab allows layers to be created, renamed, deleted, reordered, "frozen," and
merged.
Thumbnail previews of each layer or object show before each entry—hover your
cursor over the thumbnail for a larger preview.
In order to create a new object on a particular layer, you'll first need to "activate"
(select) that layer.
To select a particular layer:
• Click a layer name in the Layers tab.
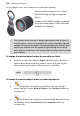
To add a new layer:
• In the Layers tab, click the Add Layer button to add a new layer
above the currently selected layer.
To rename a layer:
• To rename a layer to something more meaningful, click on the selected
layer's name and type to add your new name (you can also make an
insertion point to edit the existing text). A good example would be to
rename the initial Layer 1 to be called Sky (as above).
- or-
• Double-click the layer and edit the Name field in the Layer Properties
dialog. See Studio: Layers tab in DrawPlus Help for more details.