
Operation Manual


138 Working with Objects
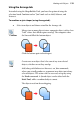
As an example, we've used a camera lens to illustrate ordering.
Notice how the lens possesses a "realistic"
look by blending overlapped composite
objects.
Gradient and solid fills combine to simulate
three-dimensional objects (with reflections,
highlights and shading).
Don't confuse the concept of object ordering with that of layers in
the document. Layers are created by the artist to logically separate
sections of a design for better drawing management. Within a layer,
objects are ordered with the topmost object being in front of all
other objects in that layer; the bottom object, being behind all other
layer objects.
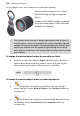
To change the selected object's order (dynamically via slider):
• From the Arrange tab, drag the Depth slider left to place the object
further down the object order (within its layer); drag right to place
object further up the order. Ordering occurs as you drag.
To change the selected object's order (via ordering buttons):
• To shift the selected object's position to the front of other
objects (on top), choose Bring to Front on the Standard toolbar (or
Arrange tab).
• To shift the selected object's position behind other objects (on
the bottom), choose Send to Back on the Standard toolbar (or
Arrange tab).