
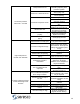
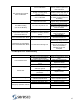
Specifications


21
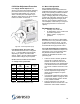
4. Start-up Procedures
4.1. Pre Start-up
A complete start-up is required to ensure all
systems have been setup and adjusted to
ensure optimum and reliable unit operation.
The final adjustment and balancing must be
done when all space and water
temperatures are at design conditions. The
use of auxiliary or portable air heaters may
be required to heat the room. Read this
section thoroughly before attempting to
commission the Seresco dehumidifier.
N
OTE: Do not use the unit as a construction
site heater. Construction dirt will invade the
unit and can significantly deteriorate unit
performance and lifespan.
1. Ensure the unit installation conforms to
all recommendations made by Seresco
in this manual.
2.
Check to ensure all packing materials
and shipping brackets have been
removed from the unit.
3.
Leak test (with halogen leak detector) all
factory and field piping. Shipping and
handling may have caused refrigerant
leaks inside the dehumidifier.
4. Check the nameplate for power
requirements and confirm that it
matches the available power supply.
5. Voltage must be within ±10% of the
voltage printed on the nameplate. Verify
that all field wiring matches the Seresco
wiring schematics. Inspect and tighten
all field and factory wiring.
6. Leave power on and allow 24 hours of
crankcase heater operation before
attempting the start-up.
7. Check the drain pan and the
condensate piping. Test the drain and
prime the P-trap by pouring water into
the drain pan.
8. Verify that any space heating coil is
installed in the supply air duct (after the
evaporator coil) and not in the return
duct.
9. PV or PH models have a pool water
heater. Energize the circulating pump
and establish water flow. Inspect the
piping and repair any water leaks.
Ensure the control wiring has been
installed between the unit and auxiliary
pool water heater.
10. Ensure the control wiring has been
installed to the outdoor air-cooled
condenser.
11. Ensure all peripheral controls and
sensors are connected and wired
correctly.
12. Verify that all service valves in the
refrigeration lines are fully open.
13. Inspect the air filters and coils to assure
they are clean. If necessary, clean the
coils and install new air filters.
14. Verify that the unit has appropriate
vibration isolators and that the unit is
level.
15. Complete the Pre Start-up checklist
section of the Warranty
Registration/Start-up Form (copy
provided with the unit and on page 34 of
this manual).
4.2. Start-up Procedure
All appropriate fields and sections of the
Warranty Registration and Start-up report
should be completed. A proper start-up
requires that the unit be run and monitored
in all modes of operation at design
conditions with the operating data recorded
on the forms provided in the annex of this
manual. Seresco reviews every report to
ensure all aspects of the system are
functioning within normal operating
parameters. Carefully follow the process
detailed in the start-up report.
If the space is not at design conditions at
the time of the start-up, a follow up visit
for final adjust and balance is required.
Mail or fax the completed start-up report
back to Seresco to validate your unit’s
warranty. Seresco will archive it for future
reference. If you do not have a start-up
report, call the Seresco for a new copy or
download a PDFversion from
www.seresco.net
.